This release significantly improves the Optimiser experience. It gives you more control over the optimisation journey and clearer guidance when issues occur.
The Optimiser now shows the optimal media allocation as soon as it is available, so you can review it before deciding whether to generate the full results. You can also download the allocation or load it into Simulator without generating the full results. For known failures, error messages now explain what went wrong and, where it applies, what you can change to fix it.
The release also includes improvements across Insights and Simulator, as well as a range of reliability and usability fixes.
TABLE OF CONTENTS
- 1. Improved Optimiser Flow: Review Allocation Before Generating Full Results
- 2. Improved Optimiser Error Messages and Guidance
- 3. Forward-Looking Simulation Periods
- 4. Period Persistence Expanded Across Insights
- 5. Multi-Stack Insights
1. Improved Optimiser Flow: Review Allocation Before Generating Full Results
Overview
The Optimiser now shows the optimal media allocation as soon as the optimisation result is available. You no longer need to wait for the complete set of media-generated effects to be calculated.
Allocation and full results generation are now separate steps. Once you have reviewed the allocation, you can modify the optimisation, continue to the complete results, start a new optimisation, download the allocation or load it into Simulator.
Why this feature matters
The media allocation is now at the centre of the Optimiser workflow. With this update, you can:
- Review and act on the recommended allocation sooner
- Decide whether you need to generate the full set of results
- Change your optimisation inputs before generating any further results
If you want the complete Optimiser journey, you can still continue to the existing full output experience.
What has changed
Before
- The Optimiser went straight from optimisation to full results generation.
- You had to wait for the whole process to finish before you could review the recommended allocation.
Now
- The optimal allocation appears as soon as it is available.
- You choose whether to continue to the complete results.
- You can download the allocation or load it into Simulator without generating the complete results.
How it works
Step 1: Run an optimisation Go to Predictions, enter your optimisation inputs and run the optimisation.
Step 2: Review the optimal allocation The Predictions > Optimisation Result page opens with Optimal allocation selected under Output.
Select Brief to see the inputs you used.
By default, the allocation appears in a single card, Your plan.
If you selected alternative optimisation when setting up the optimisation, the allocation appears in three cards:
- Your plan
- Your plan without media constraints
- Suggested alternative
Each card shows the media investment and a breakdown by media type.
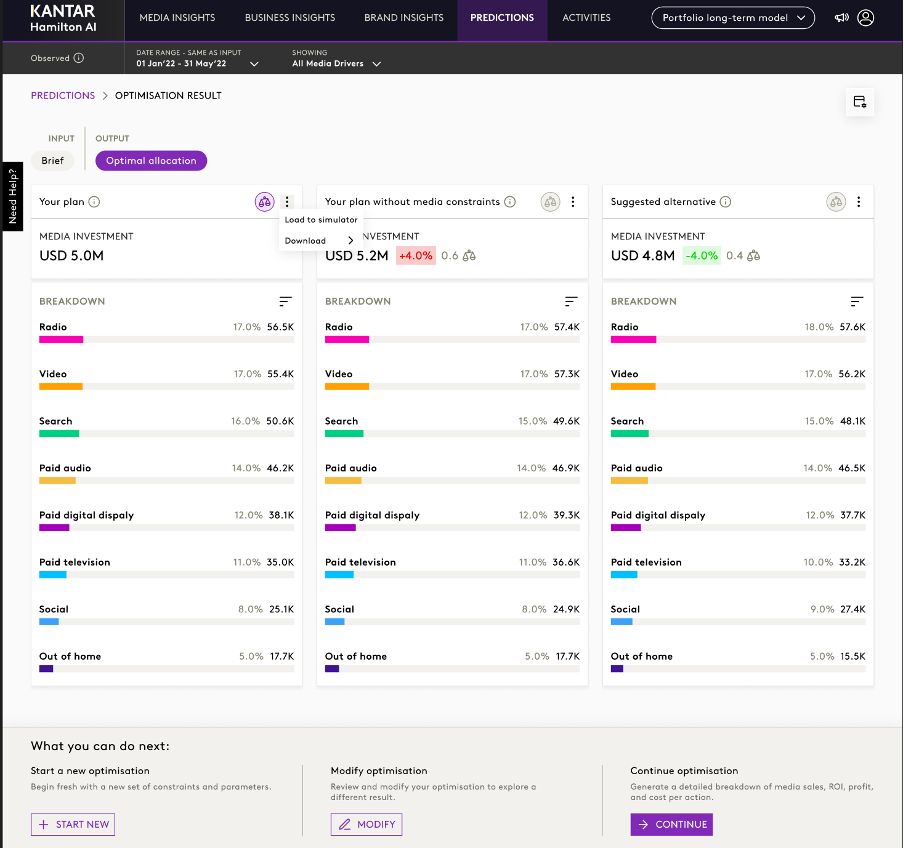
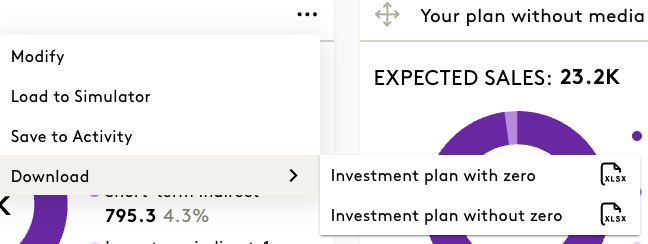
Step 3: Download or load the allocation into Simulator (optional) On the card you want, select the three-dot menu and then choose:
- Load to simulator to open the allocation in Simulator
- Download to download the allocation
Neither option requires the complete results.
Step 4: Choose what to do next
Under What you can do next, select one of the following:
- Start New: Start a new optimisation from scratch with a new set of constraints and parameters.
- Modify: Go back and change your optimisation inputs while keeping your current context.
- Continue: Generate the complete Optimiser results, including a detailed breakdown of media sales, return on investment (ROI), profit and cost per action.
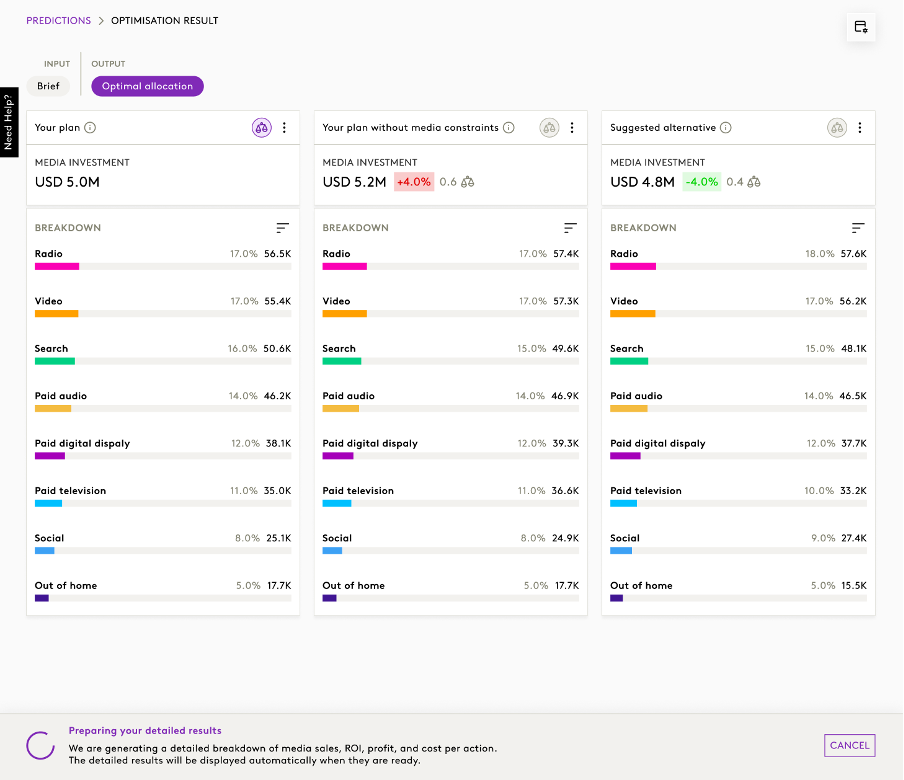
Step 5: Wait while the detailed results are generated If you select Continue, a Preparing your detailed results message appears at the bottom of the page with a progress indicator. Your allocation stays visible while the results are generated. The detailed results are displayed automatically when they are ready.
A Cancel option is available while generation is in progress.
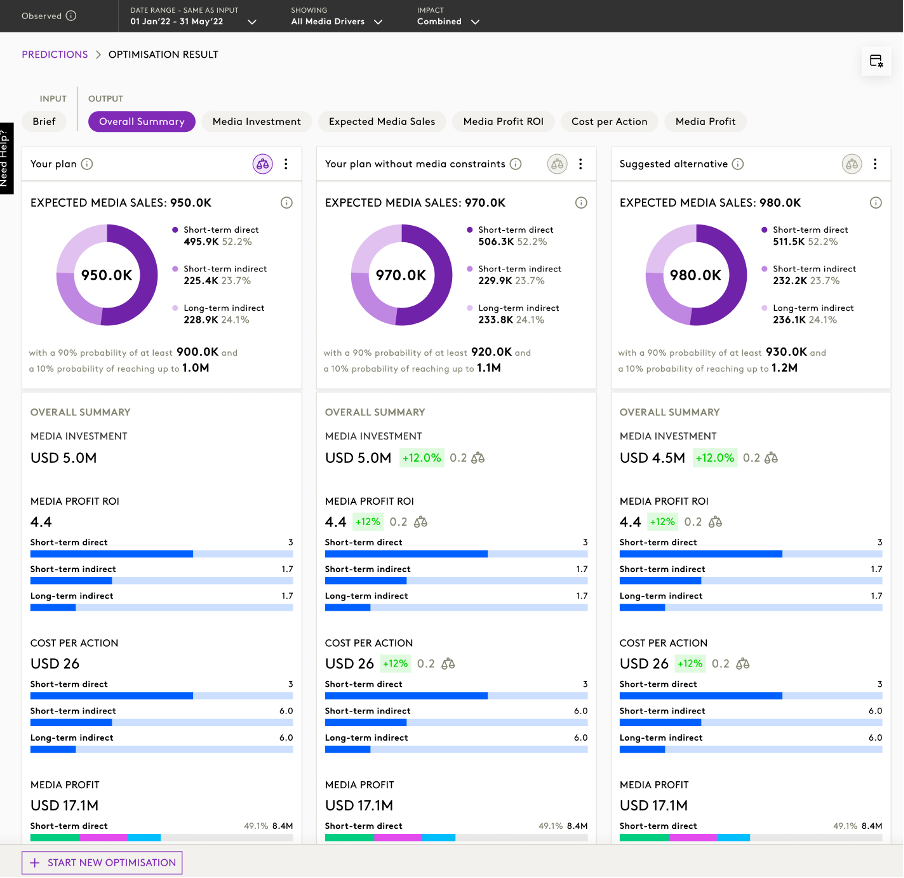
Step 6: Review the full results When generation is complete, the full output appears. Under Output, you can switch between the following views:
- Overall Summary
- Media Investment
- Expected Media Sales
- Media Profit ROI
- Cost per Action
- Media Profit
To start again, select Start New Optimisation at the bottom of the page.
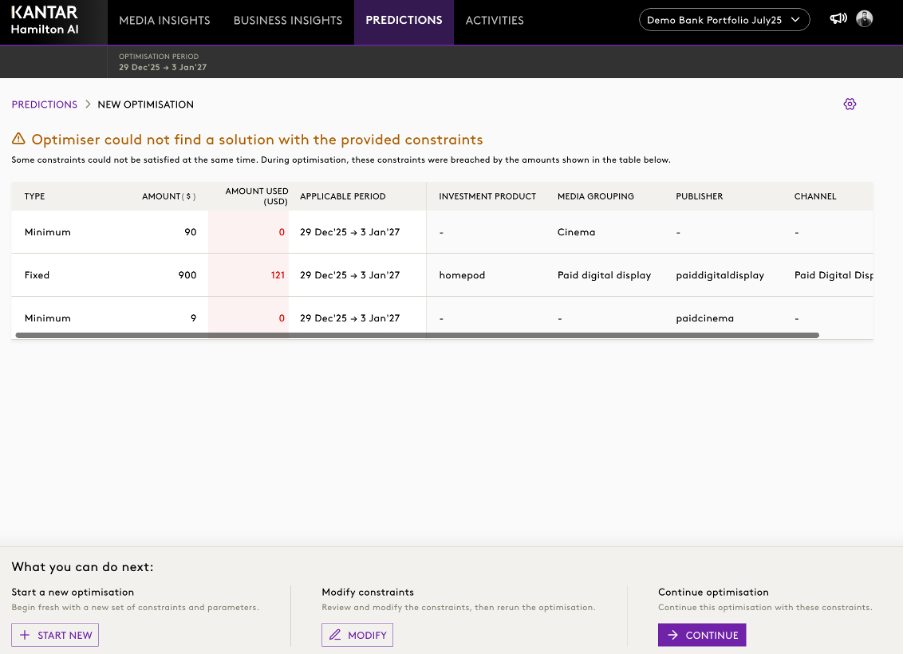
When a feasible solution cannot be found
If the Optimiser cannot find a feasible solution, it shows the best-effort allocation and clearly marks it as infeasible, instead of showing an error or a blank result.
Things to keep in mind
- The Optimiser workflow has changed. The media allocation now appears first, and you choose whether to continue to the complete results.
- You can download an allocation or load it into Simulator without generating the full Optimiser results.
- If a feasible optimisation cannot be found, the Optimiser can show a best-effort allocation marked as infeasible.
Frequently asked questions
Do I need to generate the full results every time? No. You can review the allocation and then download it or load it into Simulator without generating the complete results.
Will I lose my inputs if I select Modify? No. Modify lets you change the inputs while keeping your current context.
Where are the Download and Load to simulator options? Select the three-dot menu at the top right of an allocation card.
Do I need to refresh the page once I select Continue? No. The detailed results are displayed automatically when they are ready.
What happens if the Optimiser cannot find a feasible solution? It shows a best-effort allocation and clearly marks it as infeasible.
2. Improved Optimiser Error Messages and Guidance
Overview
When a known problem occurs, the Optimiser now gives you clearer error messages that tell you what to do next. Instead of a generic error, it explains what went wrong and, where it can, tells you how to fix it.
Why this feature matters
For known problems, the Optimiser no longer shows only a generic error. With this update, you can:
- Understand what went wrong
- See whether you can fix the problem yourself
- Find out what to do next, where guidance is available
What has changed
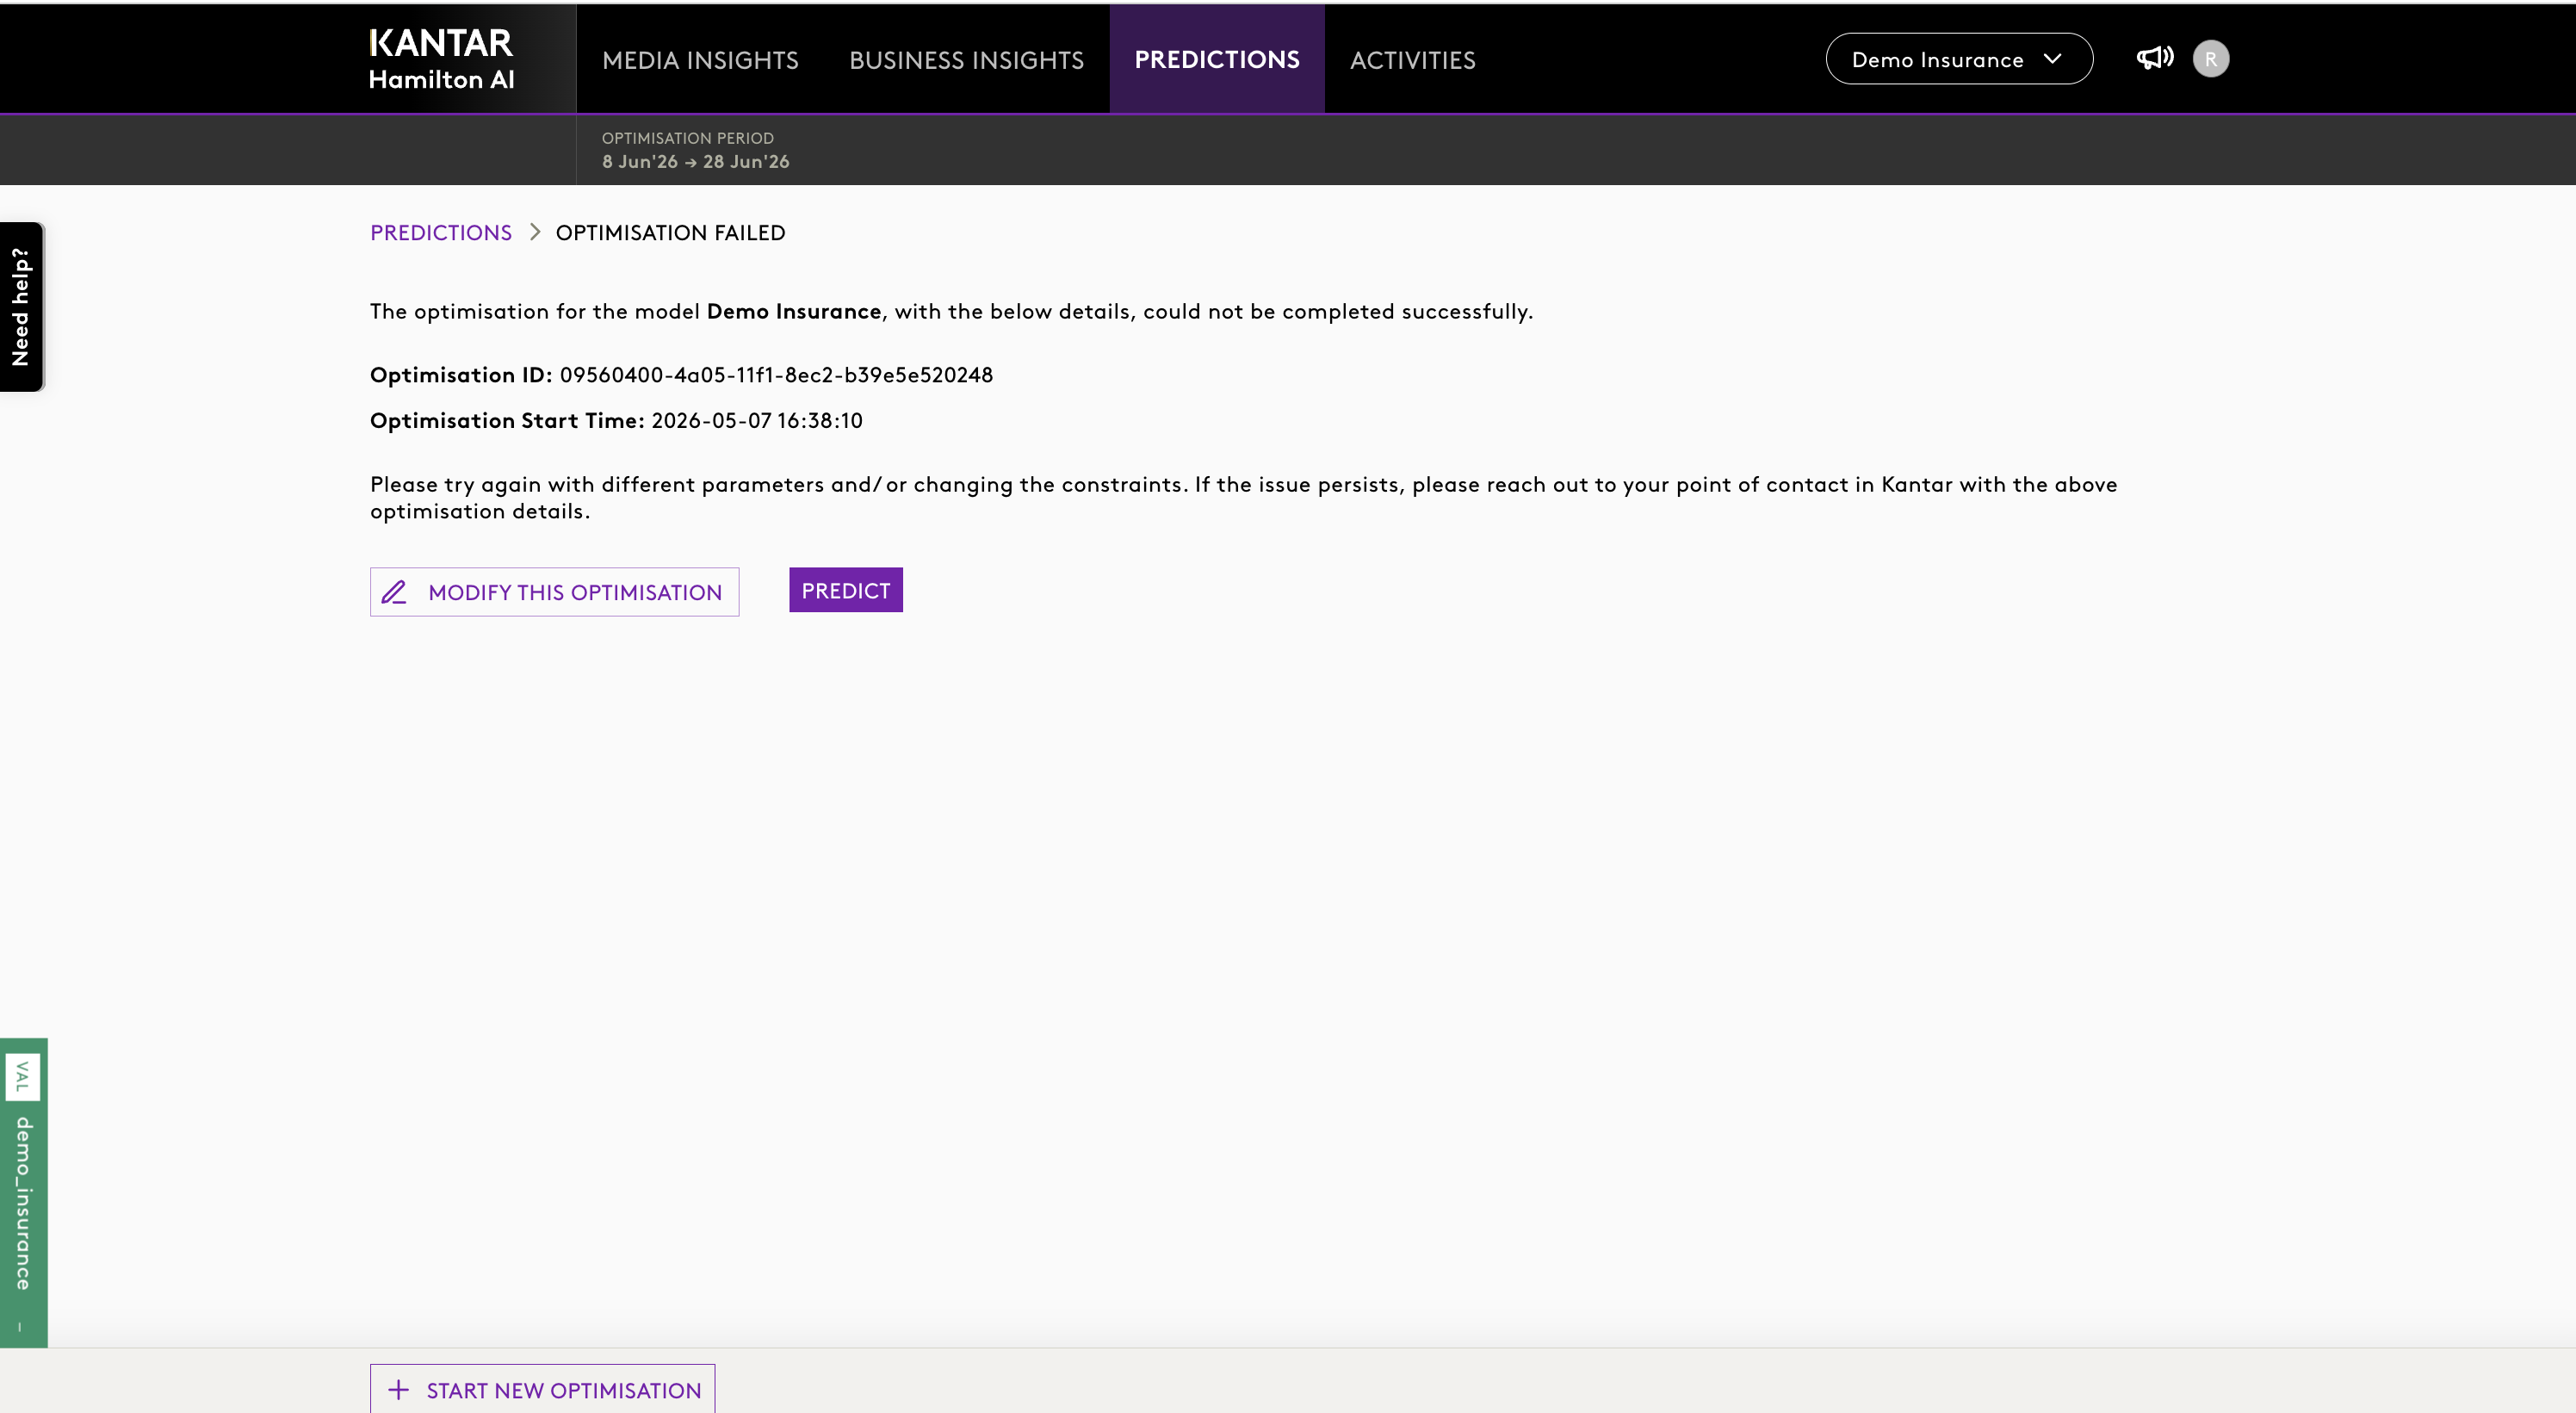
Before
- You could see a generic error message such as "Internal server error. Please try again".
- The message gave little indication of what had gone wrong or whether changing the optimisation could fix it.
Now
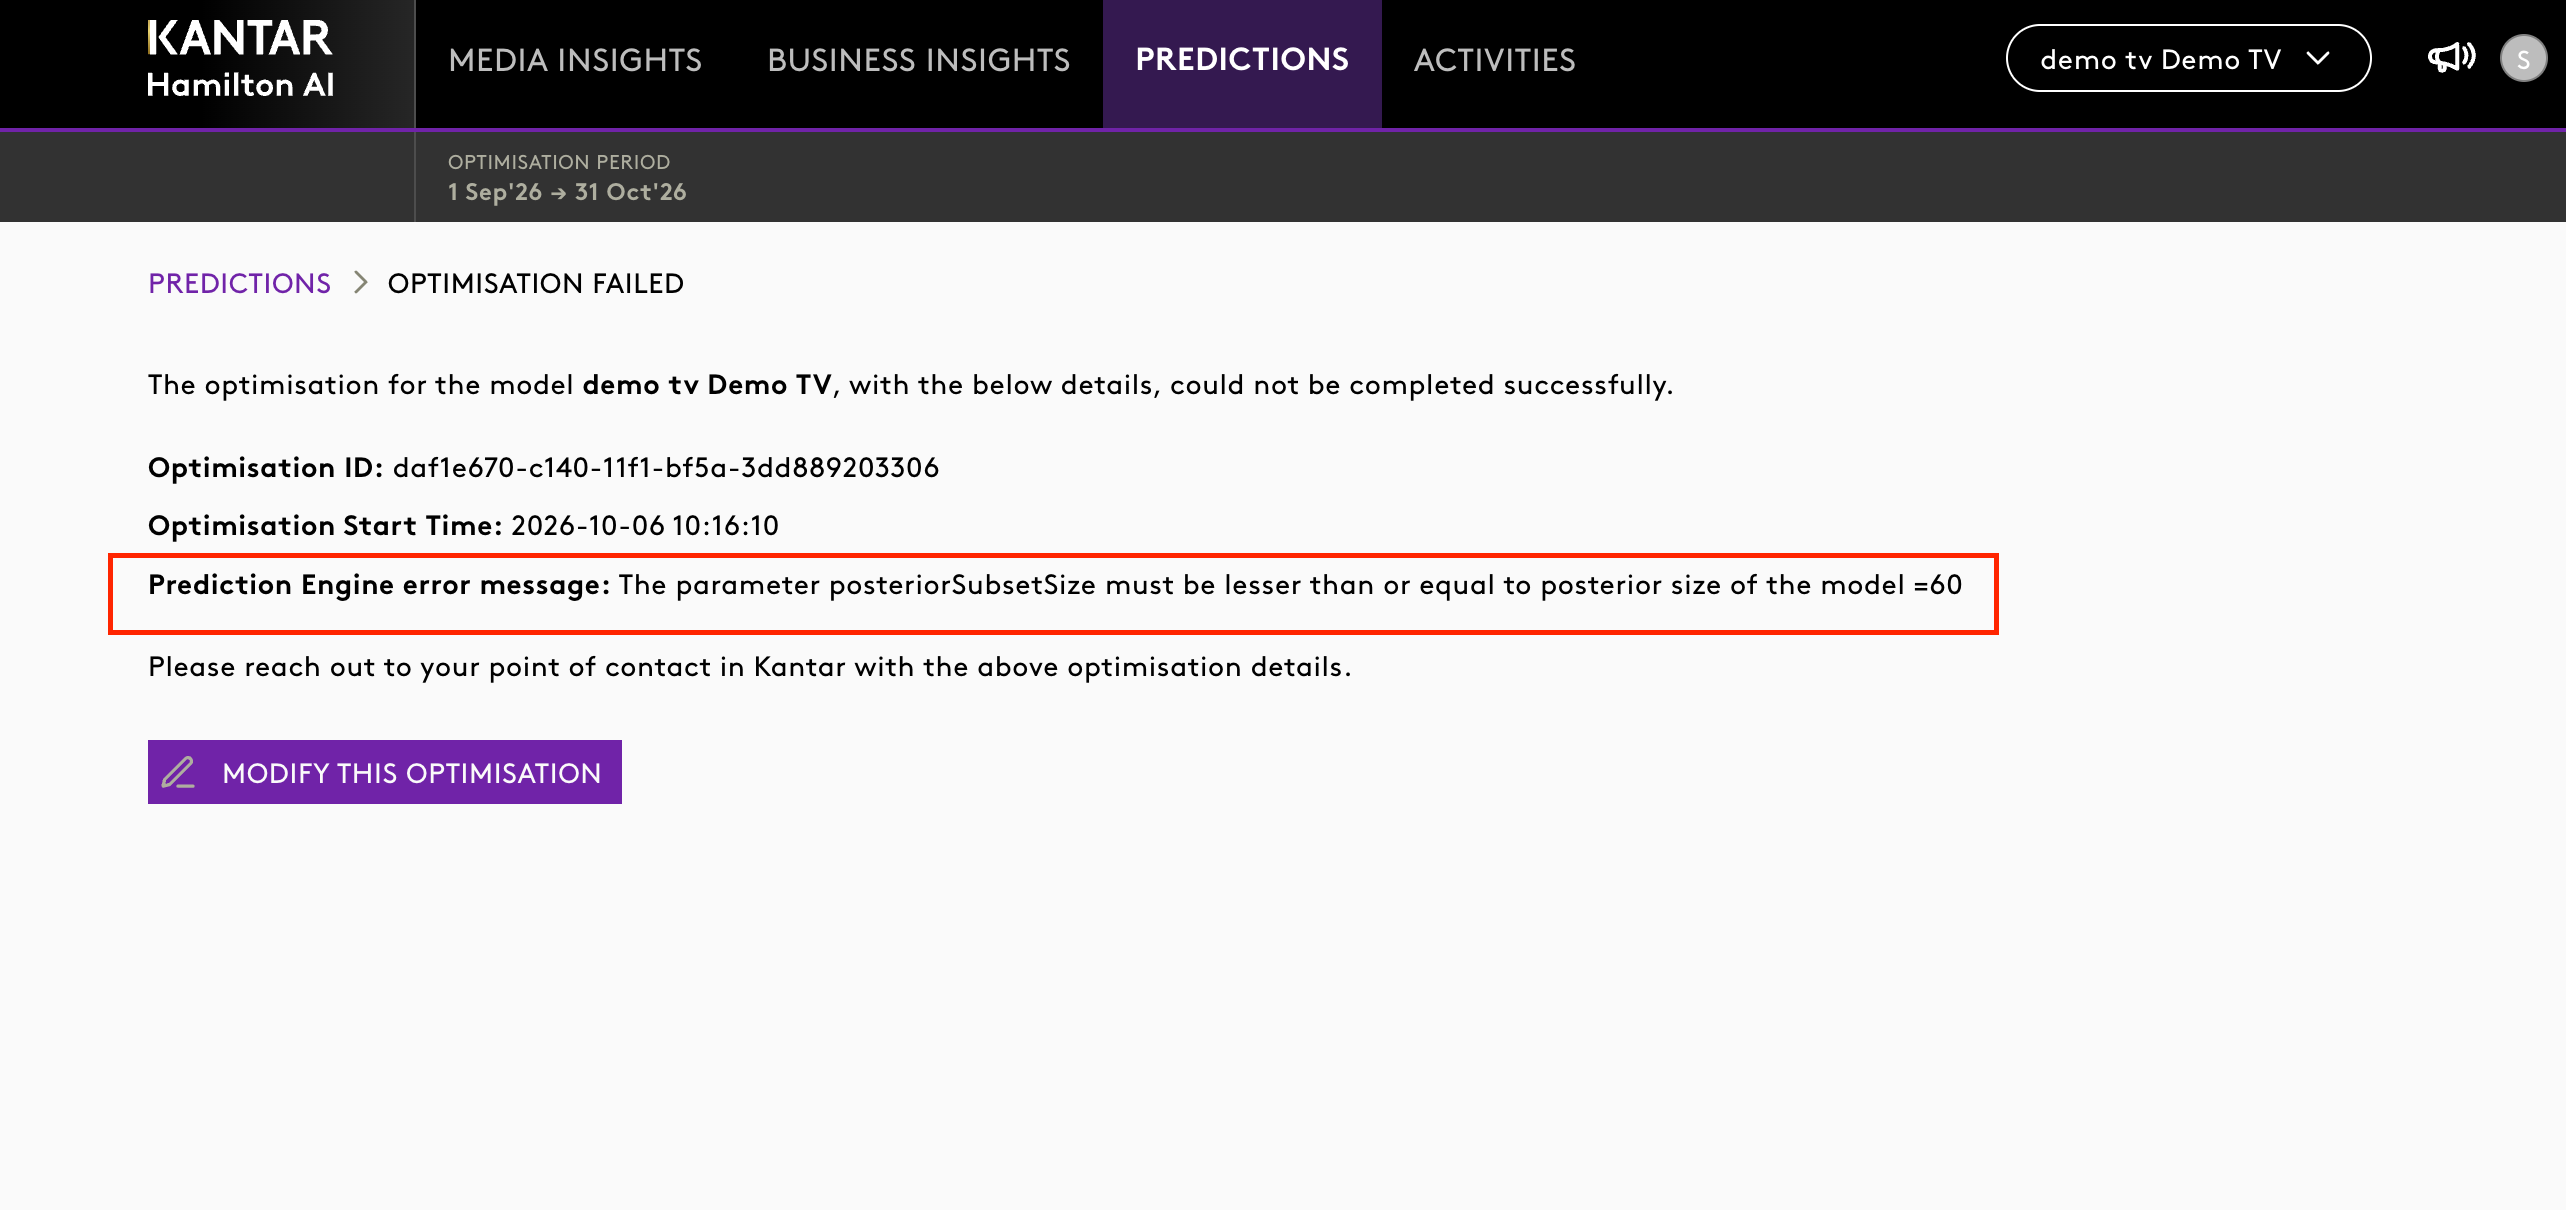
- For known problems, the error message explains the specific issue.
- Where it applies, the message suggests what to do next.
Covered scenarios
The improved messages cover known problems such as:
- Invalid constraint configurations
- Missing required model data
- Unsupported optimisation settings
- Insufficient budget ranges
- Prediction service availability issues
Where it applies
The improved error messages apply across:
- Optimiser setup
- Optimiser execution
- Optimiser result generation
How it works
Step 1: Review the Optimisation Failed page If an optimisation can't be completed, the Predictions > Optimisation Failed page opens. It shows:
- The model the optimisation was run on
- Optimisation ID
- Optimisation Start Time
- Prediction Engine error message, which explains what went wrong
Step 2: Follow the guidance in the message Where it applies, the message may suggest that you:
- Review your constraint configuration
- Adjust budget ranges
- Change the optimisation period
- Retry the optimisation
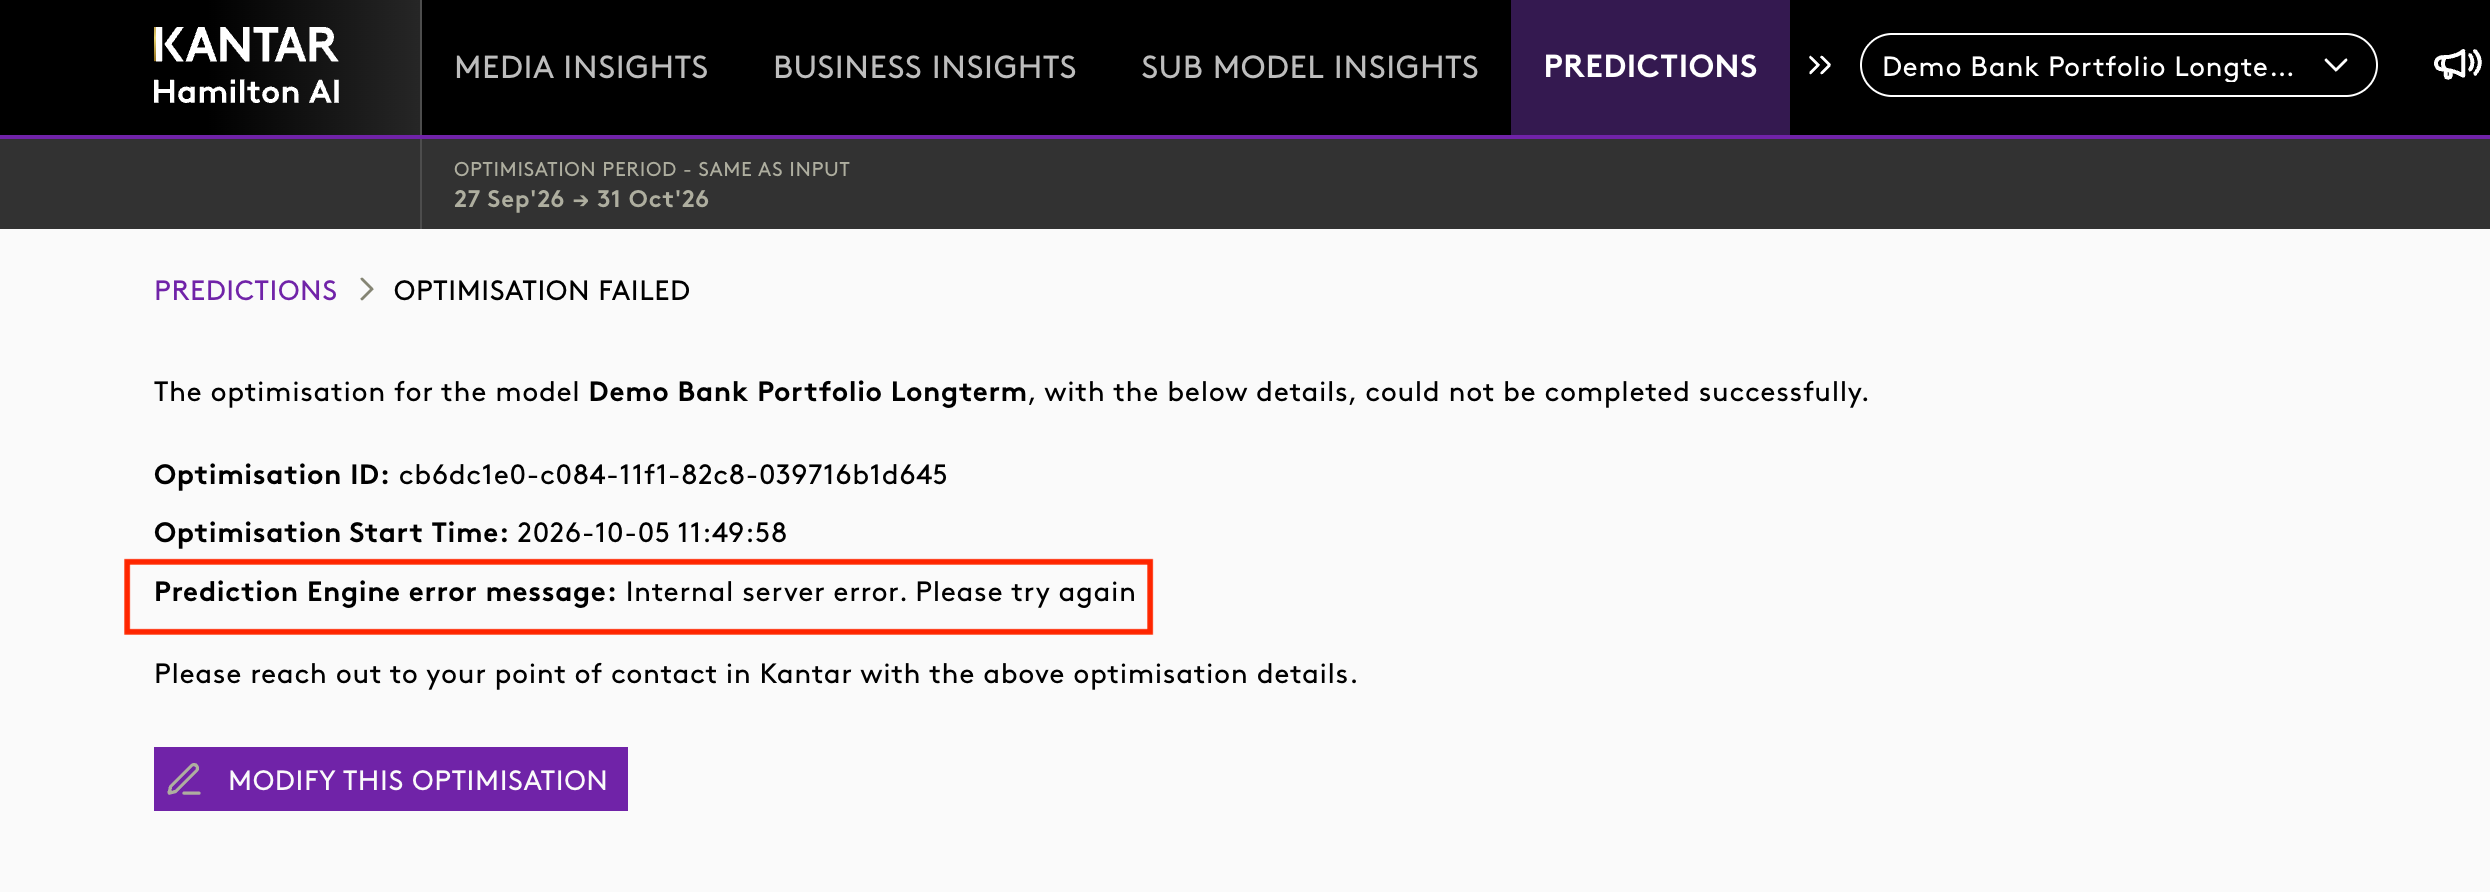
Step 3: Modify the optimisation Select Modify this optimisation to go back to your inputs, make the changes and run the optimisation again.
Step 4: Contact Kantar if you need help If you can't fix the problem yourself, contact your point of contact at Kantar. Include the Optimisation ID and Optimisation Start Time shown on the page.
Things to keep in mind
- The improved error messages apply to known problems only.
- Detailed technical information is still available to support teams for troubleshooting. Sensitive details about how the platform works are not shown to users.
- Always include the Optimisation ID and Optimisation Start Time when you contact Kantar, so the issue can be investigated quickly.
Frequently asked questions
Will every error now show a detailed explanation? No. The improved messages apply to known problems across setup, execution and result generation.
What should I do if the message suggests a change? Select Modify this optimisation, make the suggested change and run the optimisation again.
What details should I share when I contact Kantar? Share the Model details along with Optimisation ID and Optimisation Start Time shown on the Optimisation Failed page.
3. Forward-Looking Simulation Periods
Overview
The Simulation Period presets in Simulator now look forward in time, in the same way as Optimiser.
Why this feature matters
Period selection now works the same way in Simulator and Optimiser.
What has changed
Before
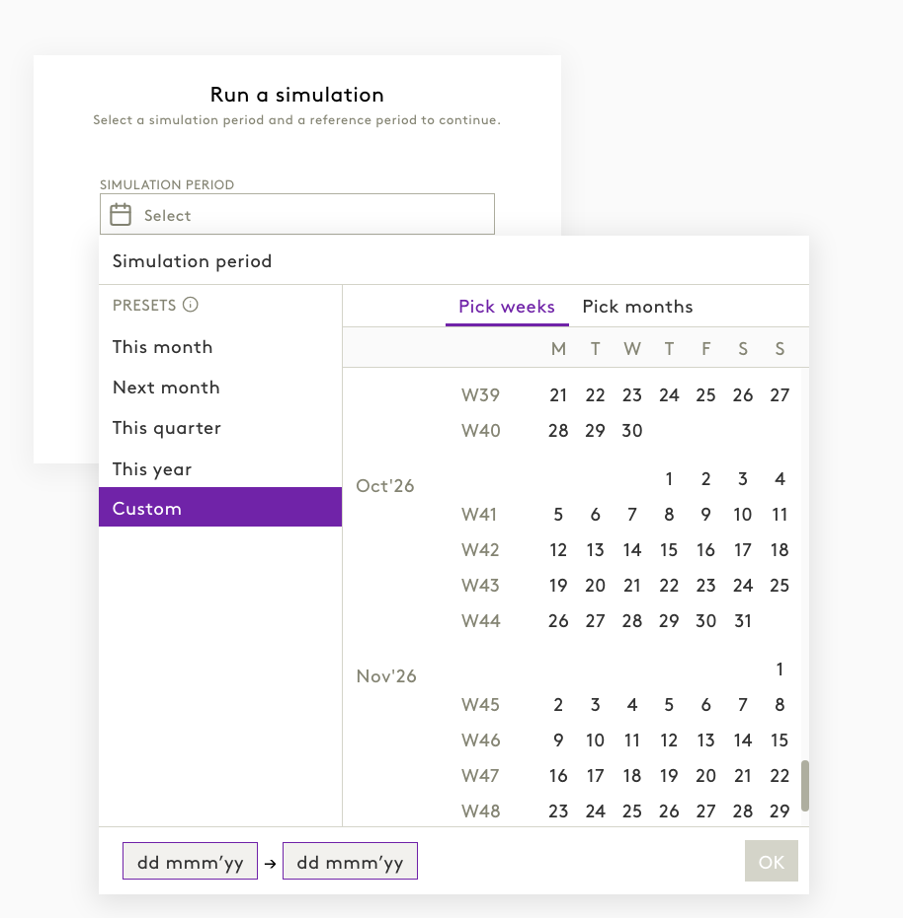
- Simulator offered presets that looked back in time.
Now
- The presets that looked back in time have been removed.
- The following presets are available: This month, Next month, This quarter, [Next quarter], This year, [Next year].
- Custom is still available for any other date range, including past periods.
How it works
Step 1: Open Simulator. The Run a simulation window appears.
Step 2: Under Simulation Period, select the date field.
Step 3: Choose a preset from the Presets list.
Step 4: To use another date range, select Custom and then:
- Choose Pick weeks or Pick months
- Select the start and end dates in the calendar, or type them in the date fields at the bottom
- Select OK
Things to keep in mind
- Use Custom if you need to simulate a past period.
4. Period Persistence Expanded Across Insights
Overview
Your selected period and comparison period are now kept across Media Insights, Business Insights and Brand Insights / Sub-Model Insights
Why this feature matters
Your selected period and comparison period are kept, so you don't need to select them again each time you return to these pages.
What has changed
Before
- The period and comparison period reset to the default when you moved between modules or returned to a page.
Now
- Your Selected Period and Comparison Period are kept in Media Insights, Business Insights and Brand Insights / Sub-Model Insights.



How it works
Step 1: Open Media or Business Insights or Sub-Model Insights.
Step 2: Set the Selected Period and the Comparison Period.
Step 3: When you come back to the page, your selections are still in place.
Things to keep in mind
- Your period selections are saved locally for you only.
- In this release, period persistence applies to the selected period and the comparison period.
5. Multi-Stack Insights
Overview
You can now view and compare insights across multiple model stacks in Media Insights and Business Insights, alongside rolled-up totals. A model stack can be a region, a product or another configured grouping.
Why this feature matters
You can move between detailed and combined results while keeping your selected context.
What has changed
Before
- You could not view and compare insights across multiple model stacks alongside rolled-up totals.
Now
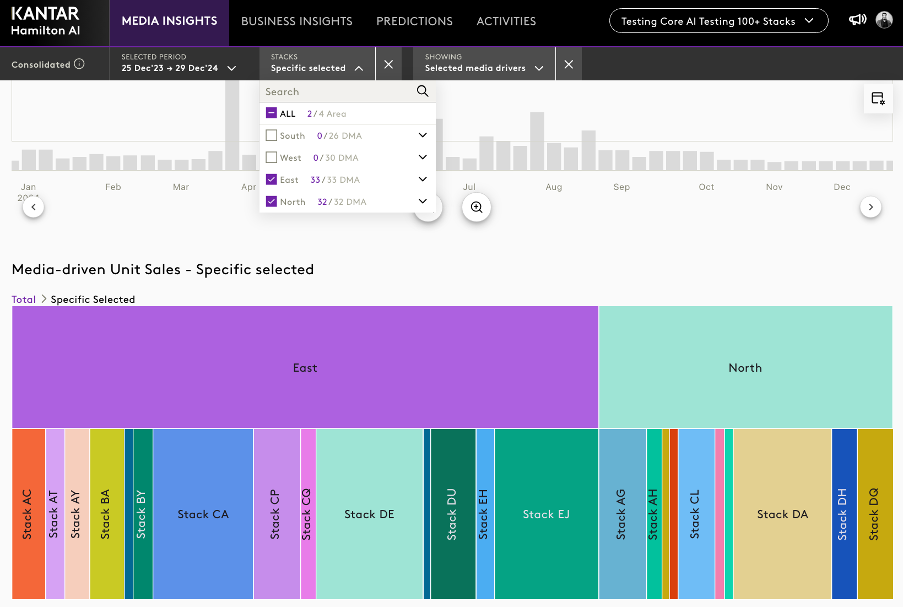
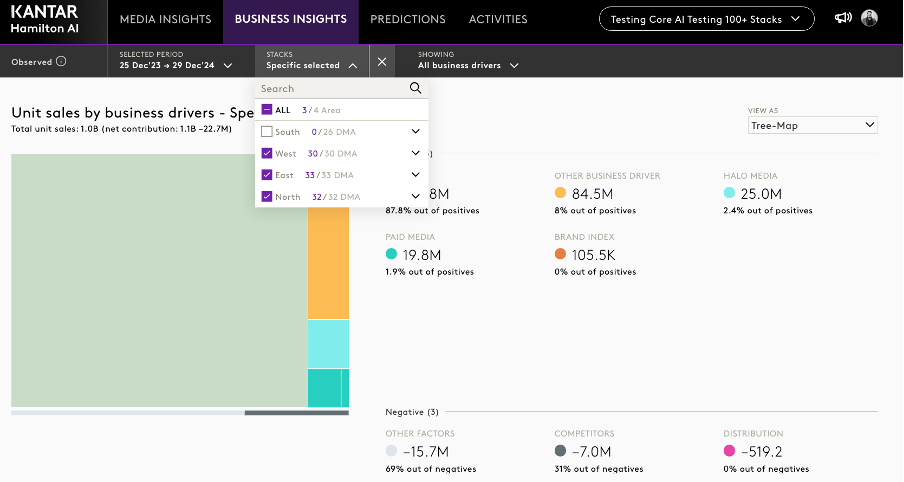
- A Stacks filter is available in Media Insights and Business Insights.
- Charts update to show the stacks you select.
Step 1: Open Media Insights or Business Insights.
Step 2: Select the Stacks filter in the top bar.
Step 3: Choose the stacks you want:
- Select All to include every stack
- Select or clear individual groups, for example South, West, East or North
- Use the arrow next to a group to expand it and select individual stacks within it
- Use Search to find a specific stack
Step 4: Review the charts. When specific stacks are selected, the filter shows Specific selected. Step 5: In the tree-map, use the breadcrumb (for example Total > Specific Selected) to move between the combined total and your selected stacks. Step 6: To clear your selection, select the cross icon next to the Stacks filter.
Things to keep in mind
- The count next to each group shows how many of its stacks are selected, for example 33/33.
Was this article helpful?
That’s Great!
Thank you for your feedback
Sorry! We couldn't be helpful
Thank you for your feedback
Feedback sent
We appreciate your effort and will try to fix the article